“For the things we have to learn before we can do them, we learn by doing them.” (Aristotle)
The foundation of making sourdough bread is the starter. A starter is made with only flour and water. The mixture is left at room temperature and refreshed regularly by discarding some of it and adding fresh flour and water. Gradually, in the course of about a week’s time, the mixture develops the wild yeast and bacteria needed to ferment dough and make bread without commercial yeast.
Learning to bake with sourdough begins with three basic steps: making a starter, preparing it for baking, and learning how to care for it over time.
The less processed ingredient options are: White Flour, Rye Flour, Whole Wheat Flour and Water.
Making a Sourdough Starter: creating a starter from flour and water and encouraging the bacteria to multiply until the starter is active
Equipment
- a Digital Scale
- 2 Glass Containers with Lids: for example, clear glass preserving jars with a 1 quart capacity (32 oz / 946 ml), preferably ones with wide mouths
- a long handled spoon or slim spatula for stirring inside the jars
Ingredients
- Organic Unenriched Hard Wheat White Flour: Hard wheat flour is the standard American variety. In Great Britain and Canada it may be called Strong White Bread Flour. Only organic unenriched white flour is guaranteed to be free of additives in the US.
- Organic Stoneground Whole Wheat Flour
- Organic Stoneground Dark Rye Flour
- Bottled Spring Water
Making the Starter
Note: The starter is mixed together then fed daily for at least 7 days. Think of a sourdough starter as an omnivore. It thrives on a varied diet of flours.
Rye flour absorbs more water than white wheat flour. The properties of rye flour make it an excellent choice for starting a sourdough culture, but it can make the starter a bit stiff or pasty. A very stiff starter can slow the movement of yeasts and bacteria and make fermentation less vigorous.
If it’s only slightly thicker than expected but still stirs easily, leave it alone until the next feeding. If it’s more like a paste than a thick batter, add a teaspoon or two of warm water and stir until it reaches a thick but easily stirrable consistency.
The aim is not a precise texture but one that is thick enough to hold some shape, but may still be stirred with a spoon. Neither is it dry, crumbly or paste-like. It is generally preferable to add a little water rather than waiting for the mixture to correct itself.
Day One
Pour 150 g of rye flour and 125 ml of warm water into one of the jars and stir it together well Cover the jar’s mouth lightly with a piece of plastic wrap and rest the lid atop it. The lid and plastic prevent the surface of the starter from drying out but still allow air to filter in. Place the jar (ideally) in a relatively warm place–for example, a sunny windowsill.
Day Two
Stir the mixture. Place 75 g of the mixture in the second jar. Add 50 g of hard wheat white flour and 50 ml of warm water. Stir everything together well, cover it as before, and leave it again for 24 hours at a relatively warm room temperature. Discard the unused starter, clean the jar and reserve it for the next day.
Day Three
Stir the mixture. In the clean jar, pour in 75 g of the mixture, and add 50 g of whole wheat flour and 50 g of white flour and 115 ml of warm water. Stir the mixture well, cover as before and leave it in a warm place for 24 hours. Discard the unused starter, clean the jar and reserve it for the next day.
Day Four
On the fourth day the starter is fed in the morning and again in the evening.
In the morning, stir the starter. Into the clean reserved jar, add 75 g of the starter and 25 g of rye, 25 g of whole wheat flour, 50 g of white flour and 115 ml of warm water. Stir to combine everything, cover again as before and return the starter to its resting place until evening–a rest of about 10 hours. Discard the unused starter, clean the jar and reserve it to use in the evening.
For the second feeding in the evening, stir the starter, then place 75 g of it in the clean jar. Add 25 g of rye flour, 25 g of whole wheat flour, 50 g of white flour and 115 ml of warm water. Stir the mixture well. Again, cover it lightly and return it to its resting place overnight. Discard the unused starter, clean the jar and reserve it to use the next day
Day Five
Begin examining the starter for signs of fermenting activity–for example, tiny pinprick size bubbles, visible through the sides of the glass or a bit of a puffy appearance on the starter’s surface. There may be none….but it is only a question of time. Starters do not ferment by the clock. Humidity, temperature, and ingredients used vary from one kitchen to another. Sourdough starters develop their own unique characteristics and at their own pace.
Stir the starter and place 75 g of it into the clean jar. Add 50 g of rye flour and 50 of white flour and 115 ml of warm water. Mix all together. Cover the starter as before and return it to its resting place. Discard the unused portion, clean the jar and reserve it to use the next day.
Day Six
Stir the starter and put 75 g of it in the clean jar. Add 50 g of rye flour and 50 g of white flour and 115 ml of warm water. Stir it, cover it as usual, and return it to its resting place until the next day. Discard the unused starter, clean the jar and reserve it to use the next day. Fasten a piece of tape on the jar or slide a rubber band down over it, level with the top of the starter in order to judge the level of its rise the next morning.
Look for increased signs of activity–small bubbles and a puffy appearance. A pattern of fermentation activity may slowly be developing: After feeding, yeasts and bacteria multiply, the starter rises, then, as the food is depleted, the starter collapses. A new starter’s rise-and-fall pattern is often erratic because the yeast and bacteria populations are still developing and coming into balance. Over time the pattern becomes more regular.
Day Seven
Stir the starter. Add 50 g of it to the clean jar, along with 50 g or rye flour and 50 g of white flour. Pour in 100 ml of warm water and stir everything together. Cover it and set the starter aside as before. Discard the unused starter, clean the jar, and reserve it for the next day.
Day Eight
Again observe the signs of activity. By the eighth day the starter may be ready to use for baking.
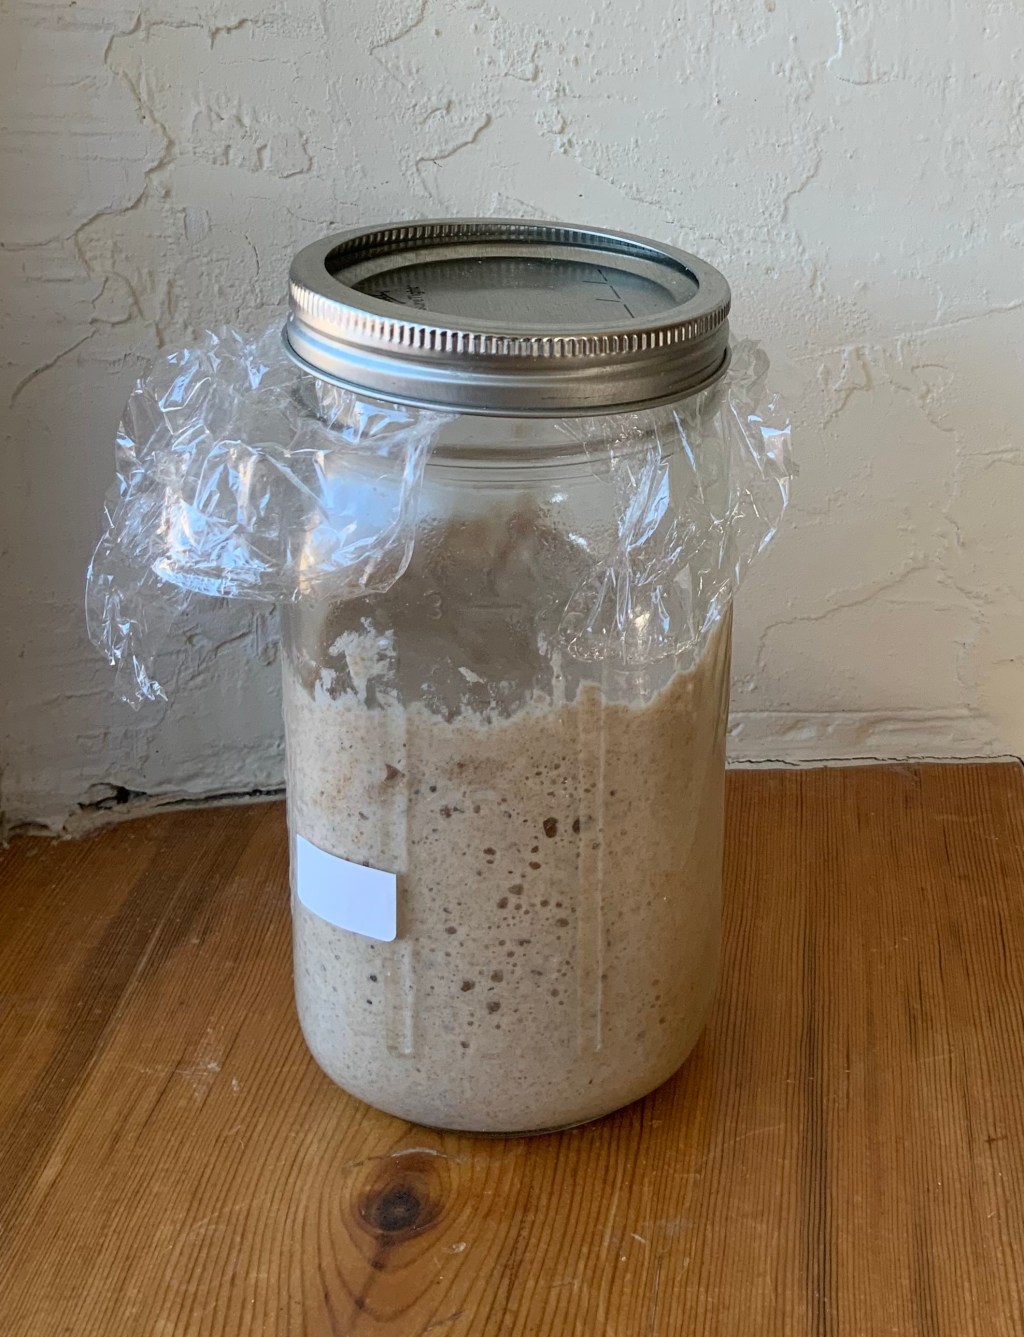
Visual signs that the starter is ready are the appearance of gas bubbles, a vigorous rise to a peak of about double in size, and a puffy, bubbly surface. The photo at the top of this post is an example of an active starter that is ready to be used for baking. The tape on the side of the jar shows that it has risen about double in bulk at its peak. (The starter will naturally deflate after reaching its peak as the yeasts and bacteria exhaust their food supply and their activity slows.) Gas bubbles appear all over the inside of the glass. This is a new starter and the bubbles tend to be smaller than those in an older one. However, it will still leaven the bread well.
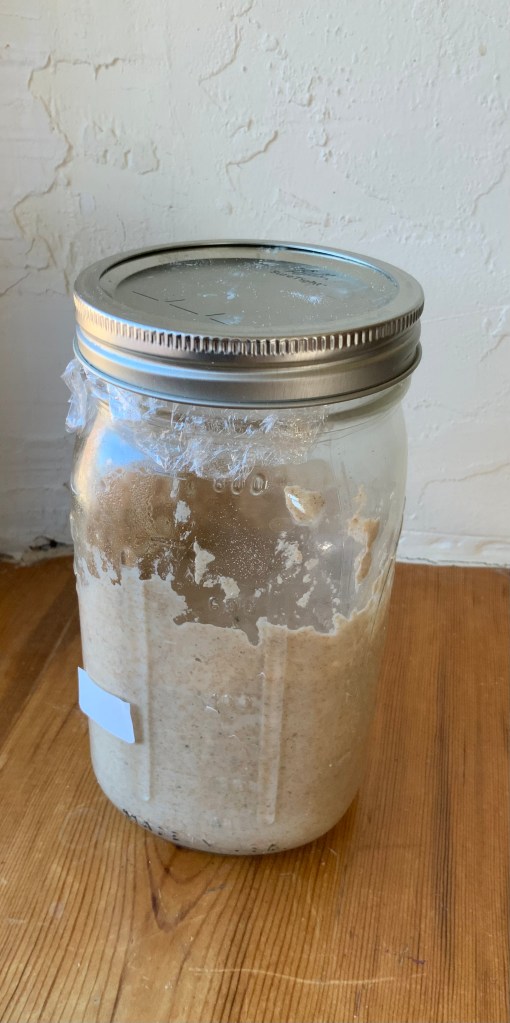
Here is a photo of a second new starter. The gas bubbles are less perceptible than in the first example, but are nevertheless present. It has also doubled in size and may be successfully used as a sourdough leaven:
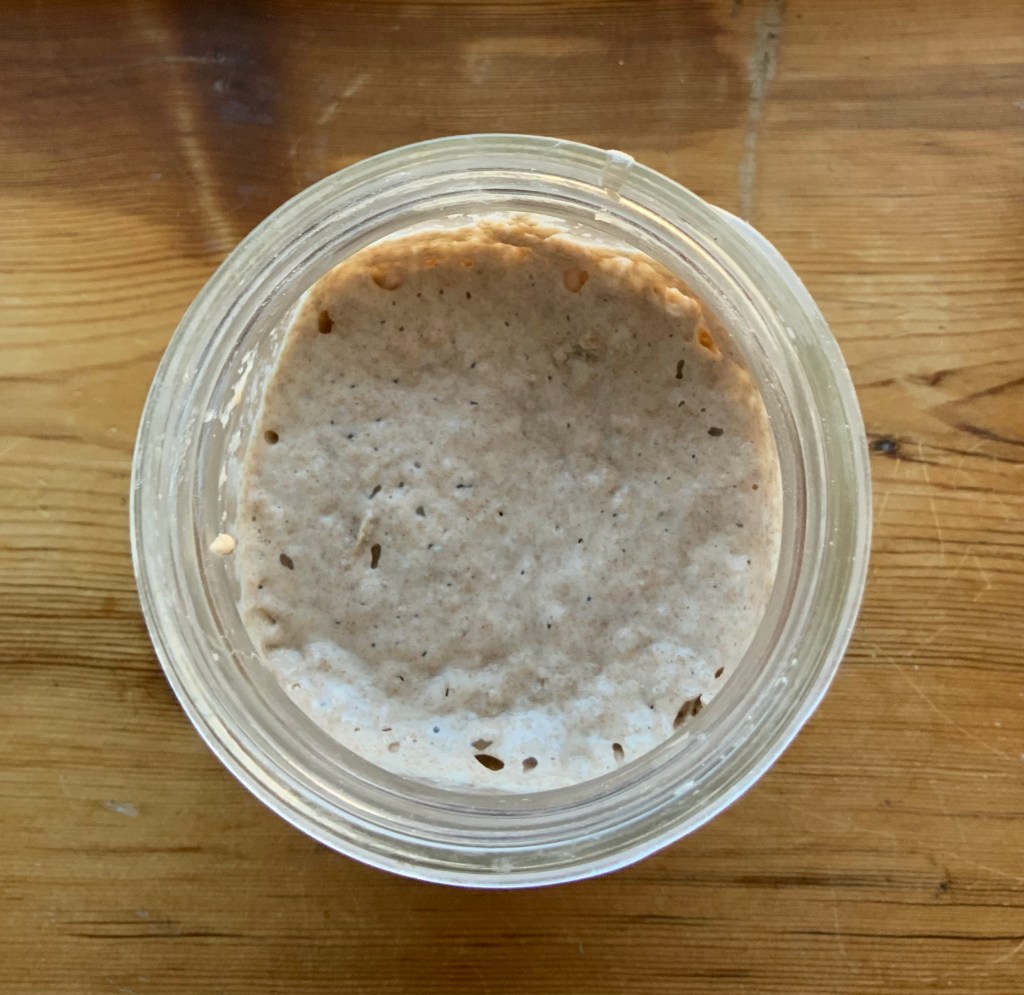
The surface of the starter is another visual sign that the starter is active and ready to use. Here is a photo from Starter #1:
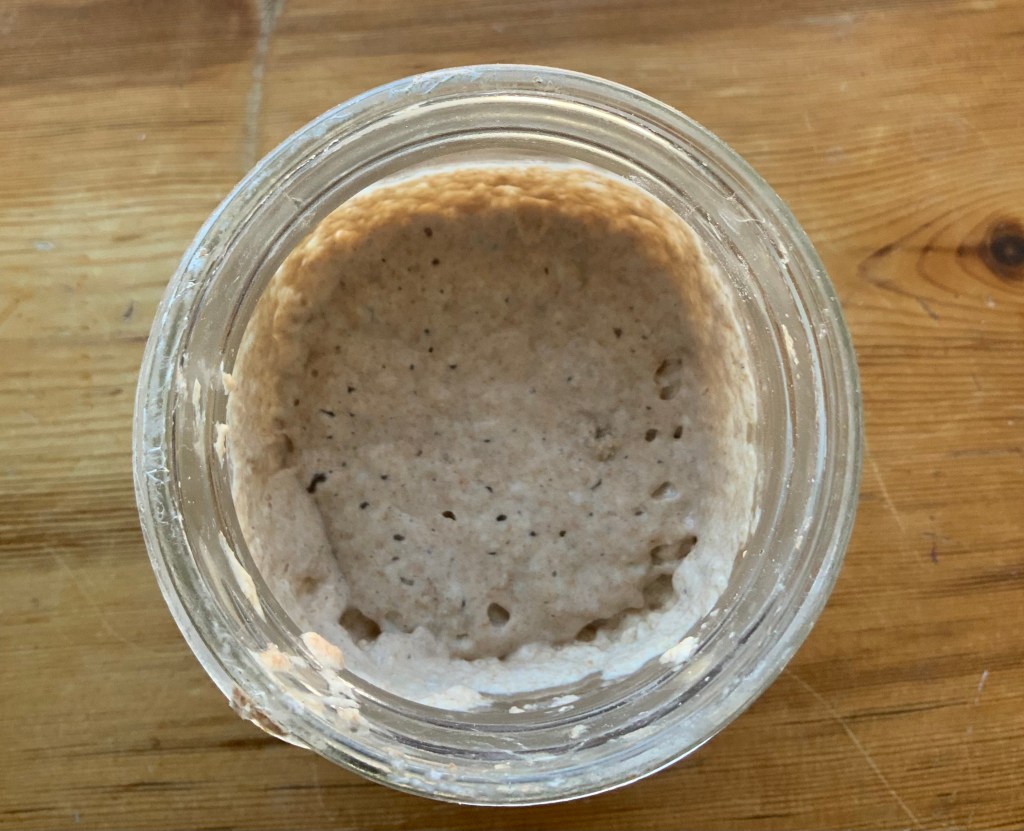
…and a photo of the surface of Starter #2:
If the starter is still a little hesitant to establish the regular visual pattern described above, continue on the same feeding schedule until it does. The time required for a starter to develop naturally varies.
This feeding schedule makes 250 g of starter. Once the starter is active and rises and falls fairly predictably place 100 g of it in a glass jar, seal the lid and put it in the freezer. This is a backup starter. It keeps well and may be thawed, fed and used for baking. There is no need to begin a new starter if, for any reason, the refrigerated one fails. See below: Caring for and Maintaining a Starter.
Lightly seal the lid on the remaining starter and place it in the refrigerator. Placing the starter in the refrigerator slows its activity. The following section describes how to prepare the starter for baking a day before making the sourdough. Some experienced bakers do not prepare the starter in advance, simply removing the amount they need for the dough, feeding the remaining starter with some flour and water and returning it to the refrigerator.
Preparing a Starter for Baking: how to feed and time your starter so it is at its peak activity and ready to leaven bread
The night before baking, remove the starter from the refrigerator and feed it. In a clean glass jar combine 100 g of the starter and 100 g total of a mixture of rye, white and whole wheat flours. The exact proportions of flours are flexible. Add 100 ml of warm water. Cover the top of the jar loosely with a piece of plastic and the jar lid and leave it at room temperature overnight. The next morning it will again have doubled in size and appear bubbly. It is ready to use as the leaven in a loaf of sourdough.
Caring for and Maintaining a Starter: how to feed, store, and refresh your starter to keep it healthy for future baking
If the refrigerated starter is used weekly, (i.e. fed and prepared for baking by feeding it and leaving it overnight the day before baking), after removing the amount needed for baking, mix 100 g of starter, 100 g of a mixture of flours and 100 g of warm water in a clean jar. Cover the jar lightly with plastic and lid it loosely and return it to the refrigerator. Discard the excess starter. (Bakers with a well-established starter sometimes don’t bother with measuring, simply stirring flours and water into the remaining starter after taking some out for baking.)
If the starter is used occasionally, not on definite schedule, remove it from the refrigerator once a week and feed it. In a clean jar, mix 100 g of starter, 100 g of a mixture of flours and 100 g of warm water. Discard the excess starter. Cover the jar lightly with plastic and the lid and return it to the refrigerator.
Refrigerated starter may be frozen if it is not going to be used for a long period of time. To begin using it again, thaw it, add 100 g of a mixture of flours and 100 ml of warm water. Stir it all together, cover it lightly with plastic and lid, and set it aside at room temperature, if possible in a warm-ish place, for 24 hours. Once the starter is visibly active again, store it in the refrigerator and bring it to its peak of activity before baking with it as described above: Preparing a Starter for Baking.








Leave a comment